GOOGLE REVIEWS
 Easter crafts with children – 5 special craft ideas
Easter is the perfect occasion to do some crafts together with the kids. Because the little ones just love the cute Easter bunnies and little lambs – whether made of colourful paper or soft wool. The possibilities for Easter crafts with children are varied and range from the classic Easter egg painting to self-made Easter nests to pretty Easter pendants for the window.
We have selected simple and original ideas for Easter crafts with children. Most of the crafting instructions can be done by the children themselves, but you should assist them from time to time – even if it’s just to hold a thread or tie a knot. But after all, Easter crafting with children is only really fun when you do it together.
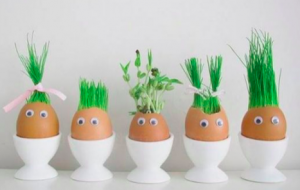
1. Making and planting egg figures with children
Egg figures are the perfect craft fun for little gardeners and super practical. You can use the natural egg shapes to create mini herb pots with your children so that you always have chives and the like at hand when cooking and eating. Big advantage: The eggshell permanently releases calcium to the plants and thus fertilizes them.
What you need:
- 4-5 eggs
- Plant soil (about 3 tsp. per egg)
- Cress seeds (alternatively chives or basil)
- Wiggle eyes (2 per egg)
- Liquid glue
- Egg cup (or an egg carton without a lid)
How to do it:
Tit the eggs at the top and free them from egg yolk and yolk (it’s best to use the egg for a delicious leftover meal). Carefully wash out eggshell from inside, let dry and place in egg cup. Pour in plant soil, moisten and sow seeds. After 1 day the seeds will germinate, after a week at room temperature and regular watering (not too much) you can eat the cress.
To turn the eggshells into cute egg figures, use two drops of liquid glue to stick the wiggle eyes onto the clean outer shell. As soon as the cress has grown long enough, you can form pretty hairstyles from it with fabric bows.
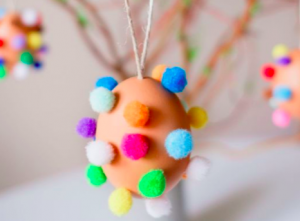
2. Make easter eggs with colourful bobbles
For colourful bumble eggs you need:
- 4-5 blown out eggs
- colorful mini pompoms (you can get them here at Amazon*)
- liquid glue
- 10 cm jute string
- toothpick
How it works:
Apply droplets of liquid glue on the blown-out eggs and stick to them at regular intervals the colourful pompoms. When the glue is dry, you can carefully widen the opening of the egg blow-out with a toothpick.
Put the piece of jute string together to form a loop, which you knot at the bottom. Gently push the double knot into the hole at the top of the egg. Now you can decorate branches or twigs with your Easter pendant.
3. Make Easter garland with children
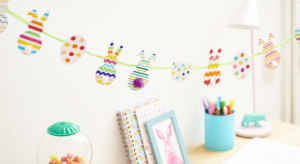
For a garland with Easter bunnies, you need:
- piece of paper
- coloured clay paper (printed on both sides)
- white or beige wool
- pencil
- fork
- scissors
- liquid glue
- Adhesive tape or thumbtacks
How it works:
For more Easter crafts, trace the outline of a bunny on paper and cut it out as a template. Now transfer the outline of your bunny template as many times as you want onto colourful clay paper and cut the individual bunnies free as well.
For the bunny pom-pom you can either use ready-made mini pom-poms or make your own pom-poms with a fork. Here is how to do it:
- Knot the wool to the middle prong of your fork and wrap the wool around the outside of the fork. Shorten the thread and secure it with a double knot.
- Cut a small piece of wool from your stash, pull it through twice in the center of the ball of wool on the fork, and tie it in a knot.
- Pull the wool ring off the fork and cut the wool bundle along the long sides. This will create a ball of wool. Shorten the threads to the desired length – this will make the pompom fluffier.
Attach the finished bunny pom-poms to the center of each of your bunnies with liquid glue.
To make a garland, poke two small holes with the tip of the scissors on the left and right sides of the outer head next to the two bunny ears. Now you can pull a woolen thread through these holes and string the Easter bunnies together with your children. Use thumbtacks or tape to secure your Easter garland to the wall.
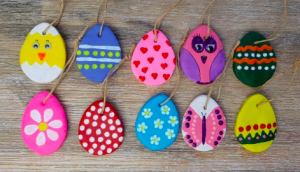
4. Make Easter eggs from salt dough
You will need:
For the salt dough:
- 1 cup salt (200 g)
- 2 cups of flour (180 g)
- 1 cup of water (150 ml)
- 1 tablespoon of oil
- some flour for rolling out
Also:
- a rolling pin
- cookie cutters egg easter
- a shish kebab, toothpick or similar for the holes
- acrylic paints and brushes
- Natural ribbon or woolen threads for hanging
Instructions:
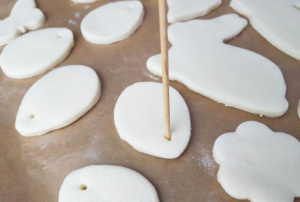
Put all the ingredients for the salt dough in a bowl, mix and then knead with your hands to form a firm dough. If the dough is still too sticky simply add a little more flour and knead again. Roll out the dough with a rolling pin on a lightly floured surface (not too thin) and then cut out eggs with the cookie cutter. Drill a hole in the top of each egg. We used a shish kebab skewer for this.
Now the eggs must harden. Let them dry on the heater for 1-3 days, depending on their thickness. Faster is in the oven. Simply bake in a 100° convection oven for 60-90 minutes (about 1 and a half hours), depending on the size.
If during the hardening in the oven bubbles appear on the eggs, simply turn them over in between or press gently with a potholder on the bubbles.
The hardened salt dough eggs can now paint it with acrylic paints. Simple watercolours from the ink box or poster colours are also suitable. With the watercolours, however, you should take as little water as possible, so that the colours cover well. When you have finished painting your salt dough artwork, let the paint dry in a warm place.
Finally, pull a ribbon through each of the holes and knot it at the end.
Tips: You can also paint/spray the finished painted salt dough artwork with clear varnish at the end. Then they shine beautifully, and are even more stable and longer-lasting.
5. Everything around Easter crafting
To the perfect Easter crafting is of course also the warping of eggs. Here we give you the best tips on how to best blow out, paint and hang eggs.
Blowing out eggs
“Blowing out” goes with a small pumping device* very elegant and hygienic. With it, you can even wash out the eggs after emptying uncomplicated. The time required per egg is about two minutes, it is much more hygienic than blowing out and I have much less stress.
Painting eggs
You can easily make a holder with integrated paint bowls out of an egg carton, wooden skewers and some tape.
Hang up the eggs
To hang the eggs, simply break a toothpick into three pieces. Knot a thread in the middle of the small pieces of wood and put it through the opening in the egg. The stick turns with the force of gravity so that it does not fall out again if handled carefully.
We wish you a wonderful Easter time doing Easter crafts together with your children!